SharePoint file management is a powerful and versatile way to organize, manage, and share files in your organization. Whether you need to collaborate on documents, secure sensitive information, or integrate with other applications, SharePoint can help you streamline your workflow and boost your productivity.
However, SharePoint file management also comes with its own challenges and frustrations. How do you navigate through the complex and sometimes confusing structure of libraries, lists, folders, and subfolders? How do you avoid creating and storing duplicate or outdated files? How do you keep track of the changes and versions of your files? How do you control who can access and edit your files?
In this blog post, we will share with you five practical and easy-to-follow tips to help you overcome these challenges and make the most of SharePoint file management. You will learn how to use metadata, views, folders, co-authoring, and permissions to find, sort, display, collaborate, and secure your files in SharePoint. By following these tips, you will be able to work with files in SharePoint more efficiently and effectively.
Tip 1: Use metadata in SharePoint File Management to categorize and filter files
Metadata is information that describes the content, context, or characteristics of a file, such as document type, project name, or author. Metadata can help you add more details and meaning to your files in SharePoint, making them easier to find, sort, and filter.
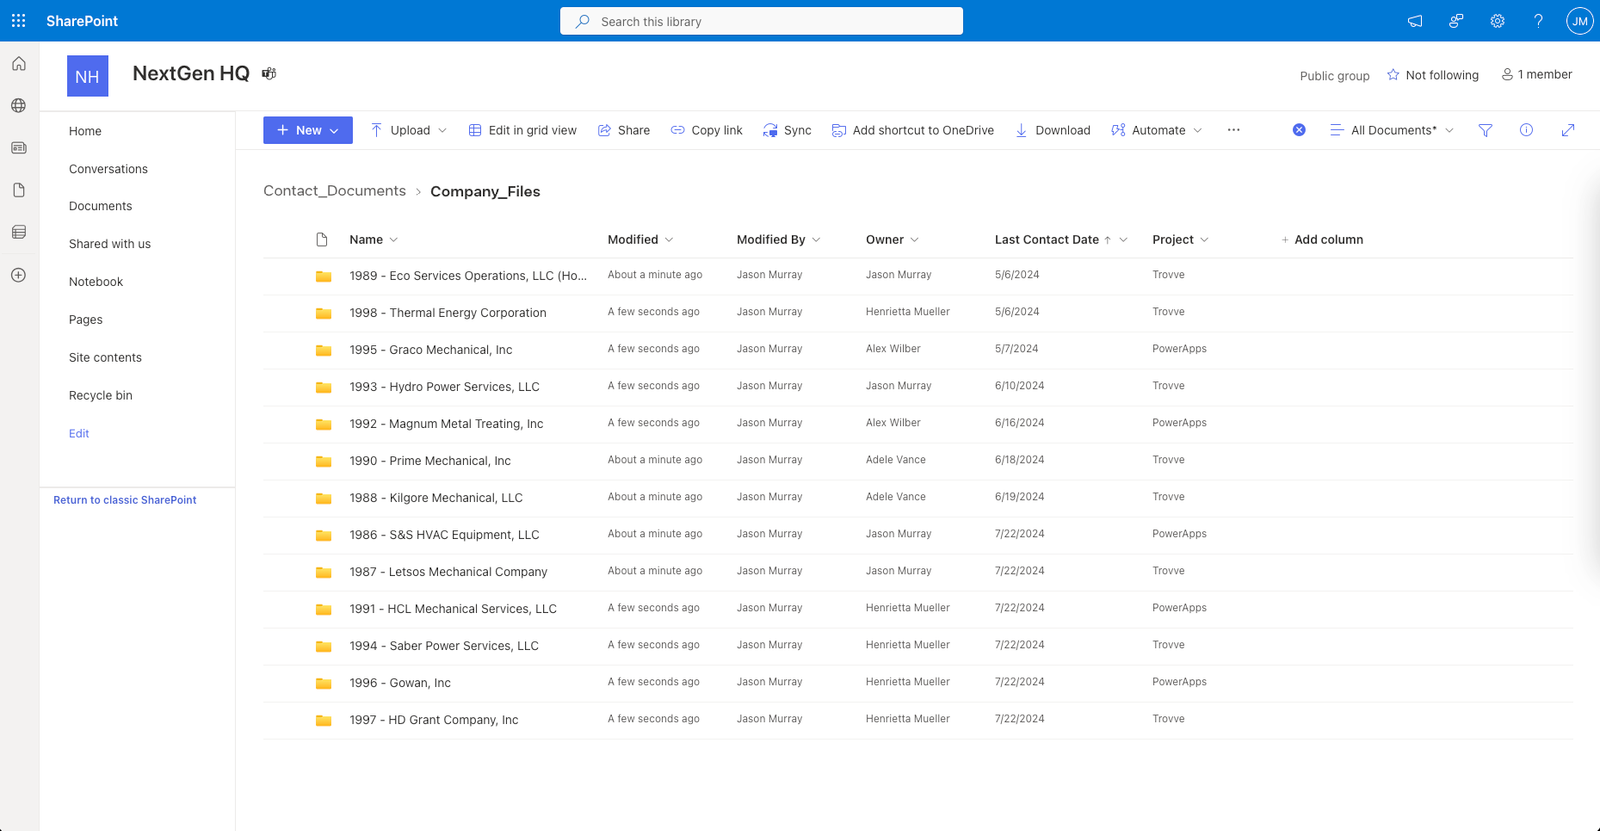
For example, if you have a SharePoint library that contains files related to different projects, you can use metadata to assign each file a project name, a status, and a due date. This way, you can quickly filter the files by project name, see which files are in progress or completed, and sort them by due date.
To use metadata to categorize and filter files in SharePoint, you need to create and apply metadata columns to your files. Here are the steps to do that:
- Go to the SharePoint library or list where you want to add metadata columns.
- Click on the Settings icon and select Library settings or List settings.
- Under the Columns section, click on Create column.
- Enter a name and a description for your column.
- Select the type of information you want to store in your column, such as text, number, date, or choice.
- Depending on the type of information, you may need to enter additional options, such as the format, the default value, or the choices.
- Under the Additional Column Settings section, you can choose whether the column is required, whether it is unique, and whether it is indexed.
- Click OK to create your column.
- Repeat the steps for each metadata column you want to create.
- To apply metadata to your files, go to the SharePoint library or list and select the files you want to edit.
- Click on the Edit icon or select Edit properties from the menu.
- Enter the metadata values for each column and click Save.
Now you can use the metadata columns to filter, sort, and group your files in SharePoint. To do that, go to the SharePoint library or list and click on the column header. You will see a drop-down menu that allows you to filter by a specific value, sort in ascending or descending order, or group by the column.
Using metadata to categorize and filter files is a fantastic way to enhance your SharePoint file management and improve your productivity.
A SharePoint library with metadata columns and a filter menu
Tip 2: Create Custom Views in SharePoint File Management to Save and Display Settings
One of the most powerful features of SharePoint file management is the ability to create views. Views are different ways of displaying the files in a SharePoint library or list, such as by grouping, sorting, or filtering them. You can use views to organize and access your files more efficiently and conveniently, depending on your needs and preferences.
For example, you can create a view that shows only the files that are modified by you, or a view that groups the files by their metadata categories, or a view that sorts the files by their creation date. You can also create views that show different columns or fields of information for each file, such as the file name, size, type, or status.
To create and save a view in SharePoint, follow these steps:
- Go to the SharePoint library or list where you want to create a view.
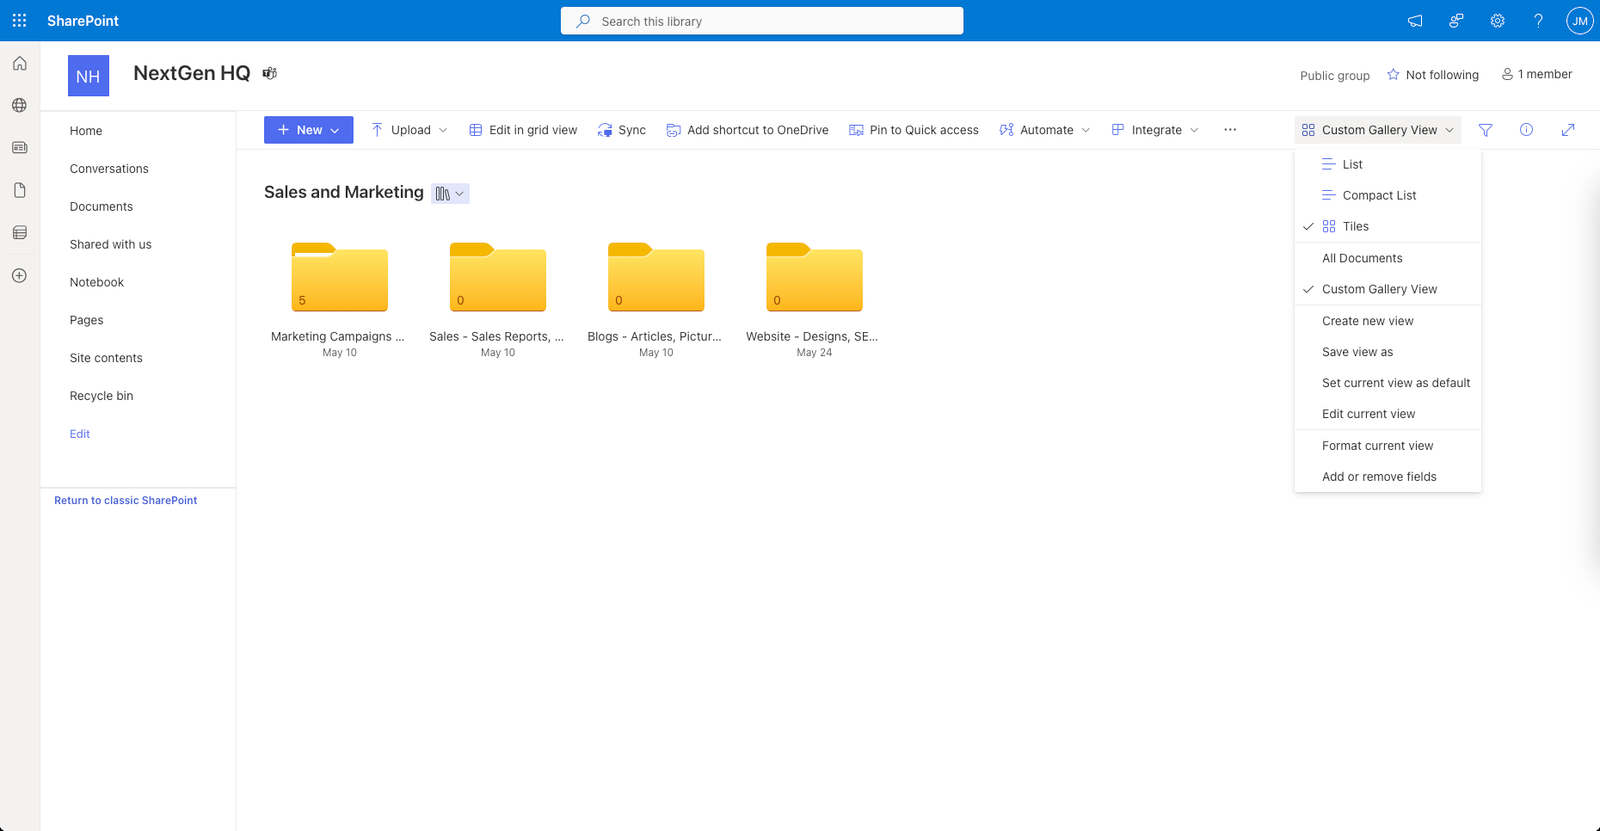
- Click on the View options icon in the top right corner and select Create new view.
- Choose the type of view you want to create, such as Standard View, Calendar View, or Gantt View.
- Give your view a name and configure the settings and options for your view, such as the columns, filters, sorts, and groups.
- Click on Save to create your view.
- To switch between different views, click on the View options icon again and select the view you want to see.
- To edit or delete a view, click on the View options icon, select Edit current view, and make the changes or click on Delete.
Creating views can help you customize and save your file display settings in SharePoint, making your SharePoint file management easier and more effective. For more information and tips on creating views, check out this Microsoft support article.
A SharePoint library with a custom view
Tip 3: Organize Files Hierarchically with Folders and Subfolders in SharePoint File Management
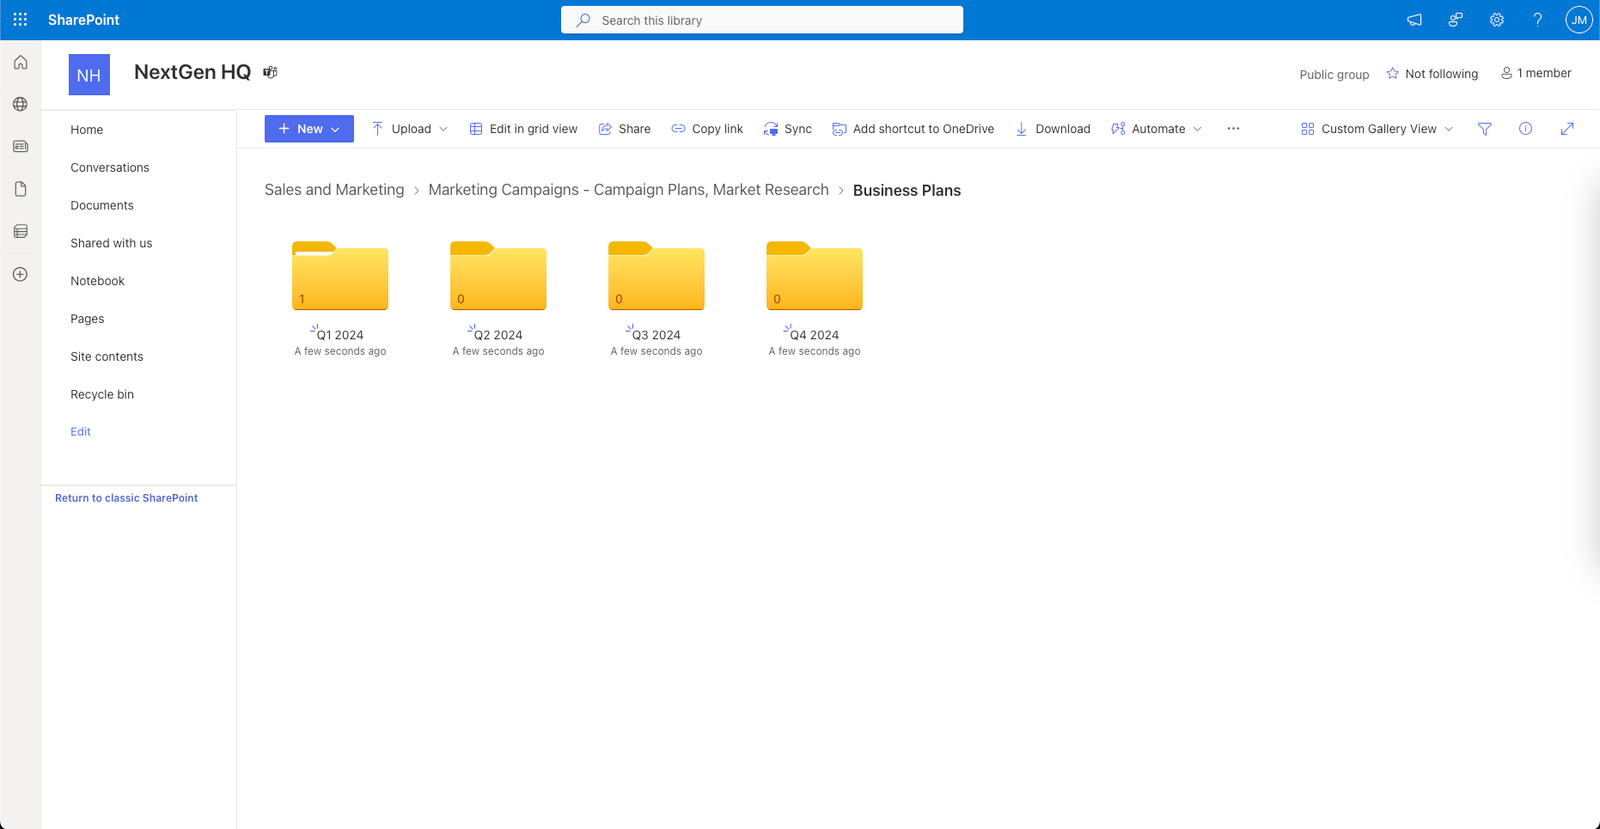
One way to organize your files in SharePoint libraries and lists is to use folders and subfolders to create a hierarchical structure. This can help you group your files by categories, topics, projects, or any other criteria that makes sense for your workflow. For example, you can create a folder for each department, and then create subfolders for each team or function within that department.
However, using folders and subfolders also has some drawbacks. It can make SharePoint file management more complex and cumbersome, as you must navigate multiple levels to find the files you need. It can also create duplication and confusion, as the same file can be stored in different folders, or different files can have the same name in different folders. Moreover, using folders and subfolders can affect the performance and functionality of some SharePoint features, such as views, metadata, search, and workflows.
Therefore, it is important to use folders and subfolders wisely and sparingly in SharePoint. Here are some best practices and guidelines to follow:
- Limit the number of levels of folders and subfolders. Ideally, you should not have more than two or three levels of folders and subfolders in your SharePoint library or list. This will make your file structure easier to navigate and maintain.
- Name your folders and subfolders consistently and clearly. Use descriptive and meaningful names that reflect the content and purpose of your folders and subfolders. Avoid using generic or ambiguous names, such as “Miscellaneous” or “New Folder”.
- Avoid duplication and redundancy. Do not store the same file in multiple folders, as this will waste space and create confusion. Instead, use shortcuts or links to refer to the same file from various locations. Also, do not create folders and subfolders that have the same or similar names, as this will make your file structure confusing and hard to distinguish.
To create and manage folders and subfolders in SharePoint, follow these steps:
- Go to the SharePoint library or list where you want to create a folder or subfolder.
- Click on the New button in the menu bar and select Folder. Alternatively, you can click on the View options icon in the top right corner and select Show in grid view. Then, right-click on any cell and select New folder.
- Enter a name for your folder and click on Create.
- To create a subfolder, open the folder where you want to create a subfolder and repeat the steps above.
- To rename, move, delete, or share a folder or subfolder, right-click on the folder or subfolder and select the option you want.
A SharePoint library with folders and subfolders
Using folders and subfolders can help you organize your files in SharePoint libraries and lists, but it can also create some challenges and limitations. Therefore, you should use them carefully and strategically, and follow the best practices and guidelines mentioned above. For more information and tips on using folders and subfolders in SharePoint, check out this Microsoft support article Should I create a list or some folders?
Tip 4: Use co-authoring and version history to collaborate and track changes
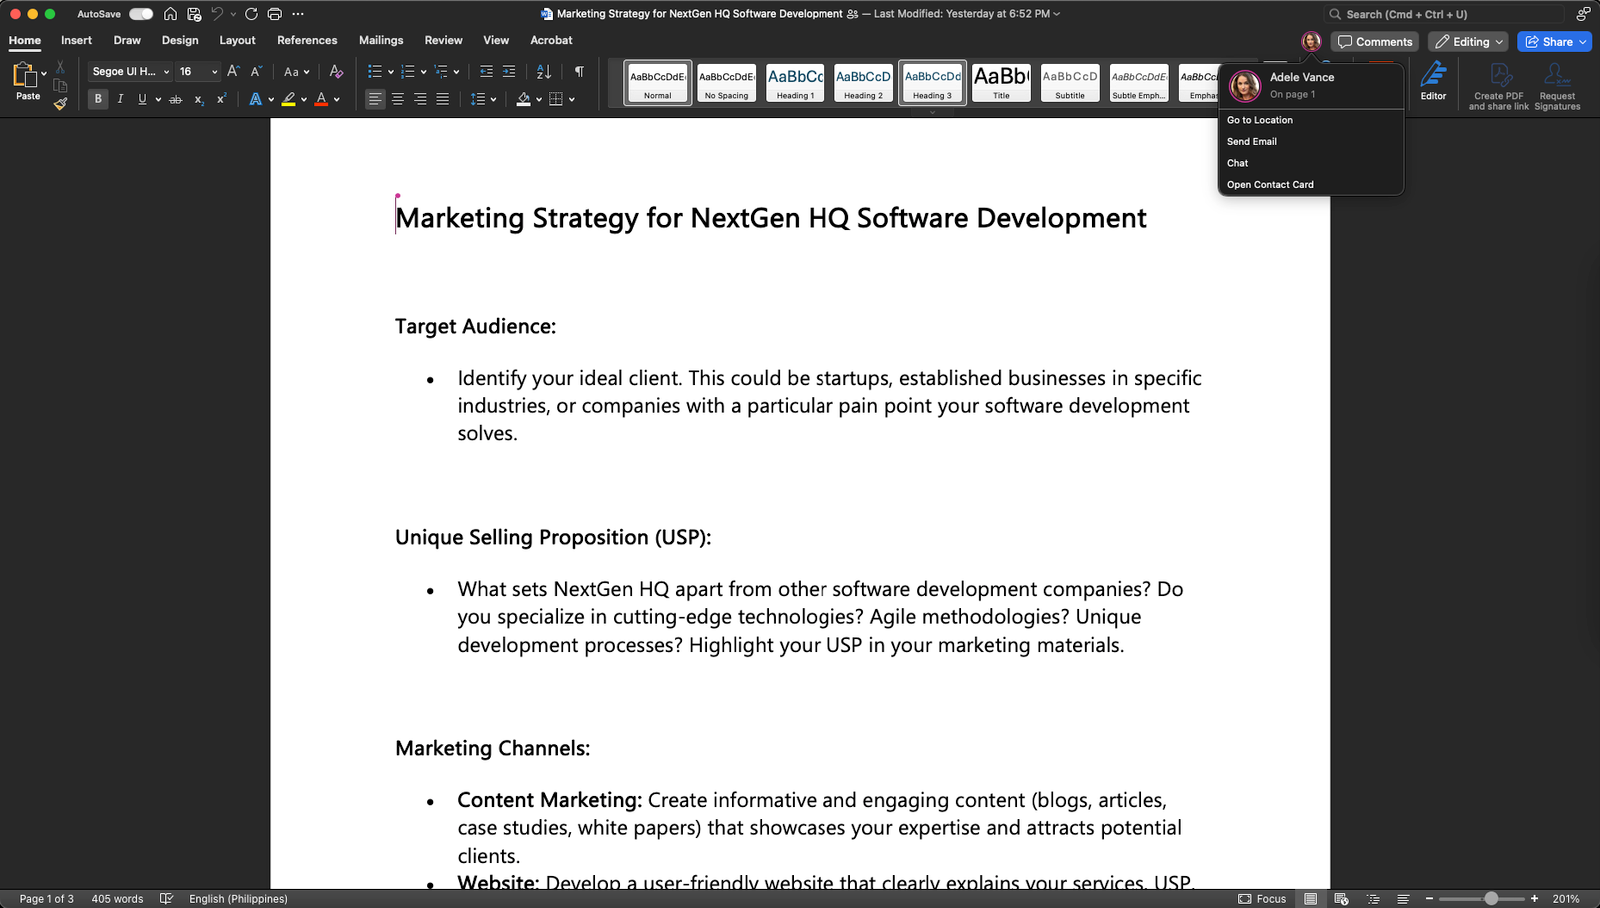
One of the most powerful features of SharePoint file management is co-authoring, which allows multiple users to work on the same file at the same time, without creating copies or conflicts. Co-authoring enables real-time collaboration and communication, as you can see who is editing the file, where they are working, and what changes they are making. You can also chat with other users, leave comments, and suggest edits within the file.
Another useful feature of SharePoint file management is version history, which records the history of changes made to a file, including who made them, when they were made, and what they were. Version history lets you compare different versions of a file, see what was added, deleted, or modified, and restore a previous version if needed. Version history helps you keep track of your work, avoid losing information, and resolve any issues or errors that may occur.
To use co-authoring and version history effectively and smoothly in SharePoint, here are some tips and tricks:
- Communicate with other users. Before you start editing a file, check if anyone else is working on it, and let them know what you are planning to do. You can use the chat feature in the file or send an email or a message through Teams or other platforms. This way, you can avoid overlapping or conflicting edits, and coordinate your work better.
- Resolve conflicts. Sometimes, you may encounter a conflict when editing a file, such as when two users try to edit the same cell in an Excel spreadsheet, or when someone saves a different version of the file while you are working on it. When this happens, SharePoint will alert you and give you options to resolve the conflict, such as keeping your changes, discarding your changes, or opening a copy of the file. You can also contact the other user and discuss how to merge your changes.
- Restore previous versions. If you accidentally delete or overwrite something in a file, or if you want to revert to an earlier version of the file, you can use the version history feature to restore it. To do this, go to the file, click on the ellipsis (…) icon, and select Version history. You will see a list of versions, with the date, time, and author of each version. You can click on a version to view it, compare it with the current version, or restore it as the current version.
To enable and use co-authoring and version history in SharePoint, follow these steps:
- Make sure the file is stored in a SharePoint library or OneDrive for Business folder, and that you and the other users have edit permissions for the file.
- Open the file in the browser or in the desktop app, depending on the file type and your preference. You can co-author Word, Excel, PowerPoint, and OneNote files in both the browser and the desktop app, but you can only co-author Visio files in the browser.
- Start editing the file as you normally would. You will see the names and cursors of other users who are editing the file, and the changes they are making. You can also chat with them, leave comments, and suggest edits within the file.
- Save the file when you are done. SharePoint will automatically save the file and create an updated version in the version history. You can view the version history by clicking on the ellipsis (…) icon and selecting Version history.
Co-authoring a Word document in SharePoint
Viewing the version history of a file in SharePoint

Tip 5: Use sharing and permissions to control file access and security
Another important aspect of SharePoint file management is sharing and permissions, which allow you to grant or restrict access to files and folders for different groups and individuals. Sharing and permissions can help you protect sensitive information, collaborate with specific people, and avoid unauthorized or accidental changes to your files.
However, sharing and permissions can also be complex and confusing, especially when you have multiple levels of access and inheritance in your SharePoint site. To use sharing and permissions wisely and safely in SharePoint, here are some best practices and recommendations:
- Follow the principle of least privilege, which means giving users only the minimum level of access they need to perform their tasks. This can reduce the risk of data breaches, errors, and conflicts. For example, you can use the view-only or read-only permissions for users who only need to see the files, and the edit or contribute permissions for users who need to modify the files. You can also use the share or co-owner permissions for users who need to manage the files and folders.
- Avoid breaking inheritance, which means changing the permissions of a file or folder that is different from its parent folder. Breaking inheritance can create confusion and inconsistency in your SharePoint site and make it harder to manage and monitor the permissions. If you need to change the permissions of a file or folder, try to do it at the top level of the hierarchy, or create a separate library or site for it.
- Review access regularly, which means checking and updating the permissions of your files and folders periodically. This can help you ensure that the permissions are still relevant and appropriate, and that no one has access to files and folders they shouldn’t. You can use the access reports and audit logs in SharePoint to see who has access to what, and who has performed what actions on your files and folders.
To share and manage permissions in SharePoint, follow these steps:
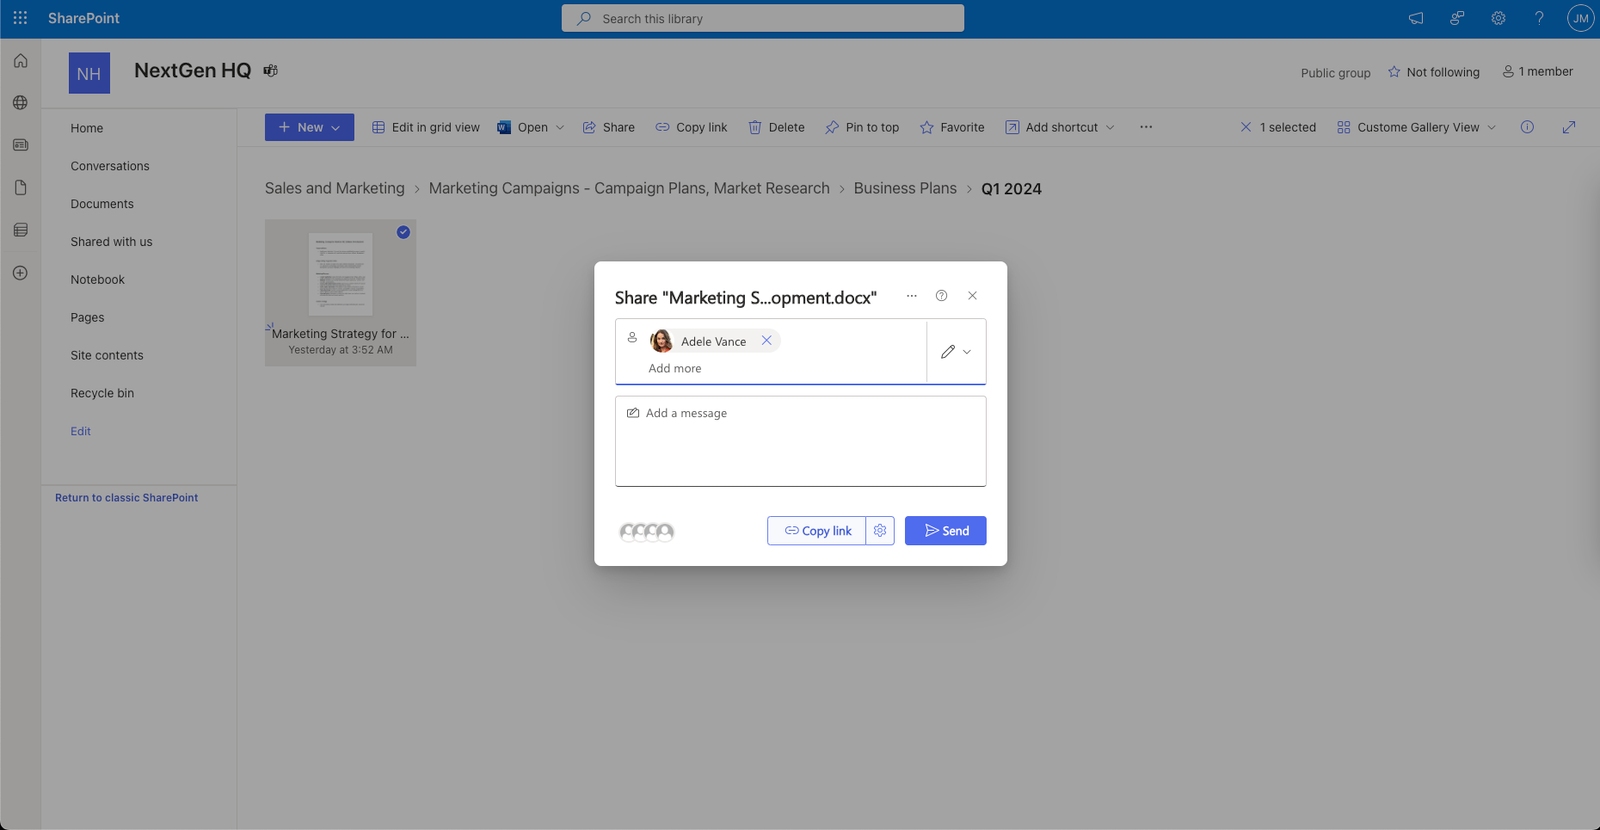
- Select the file or folder you want to share and click on the Share button. You can also right-click on the file or folder and select Share.
- Enter the names or email addresses of the people you want to share with or select them from the suggestions. You can also click on the link settings icon to change the type of link you want to create, such as anyone, people in your organization, or specific people.
- Choose the permission level you want to give them, such as view, edit, or co-owner. You can also add a message or expiration date to the link if you want.
- Click on the Send button to share the link with the selected people. You can also copy the link and share it through other channels, such as email or chat.
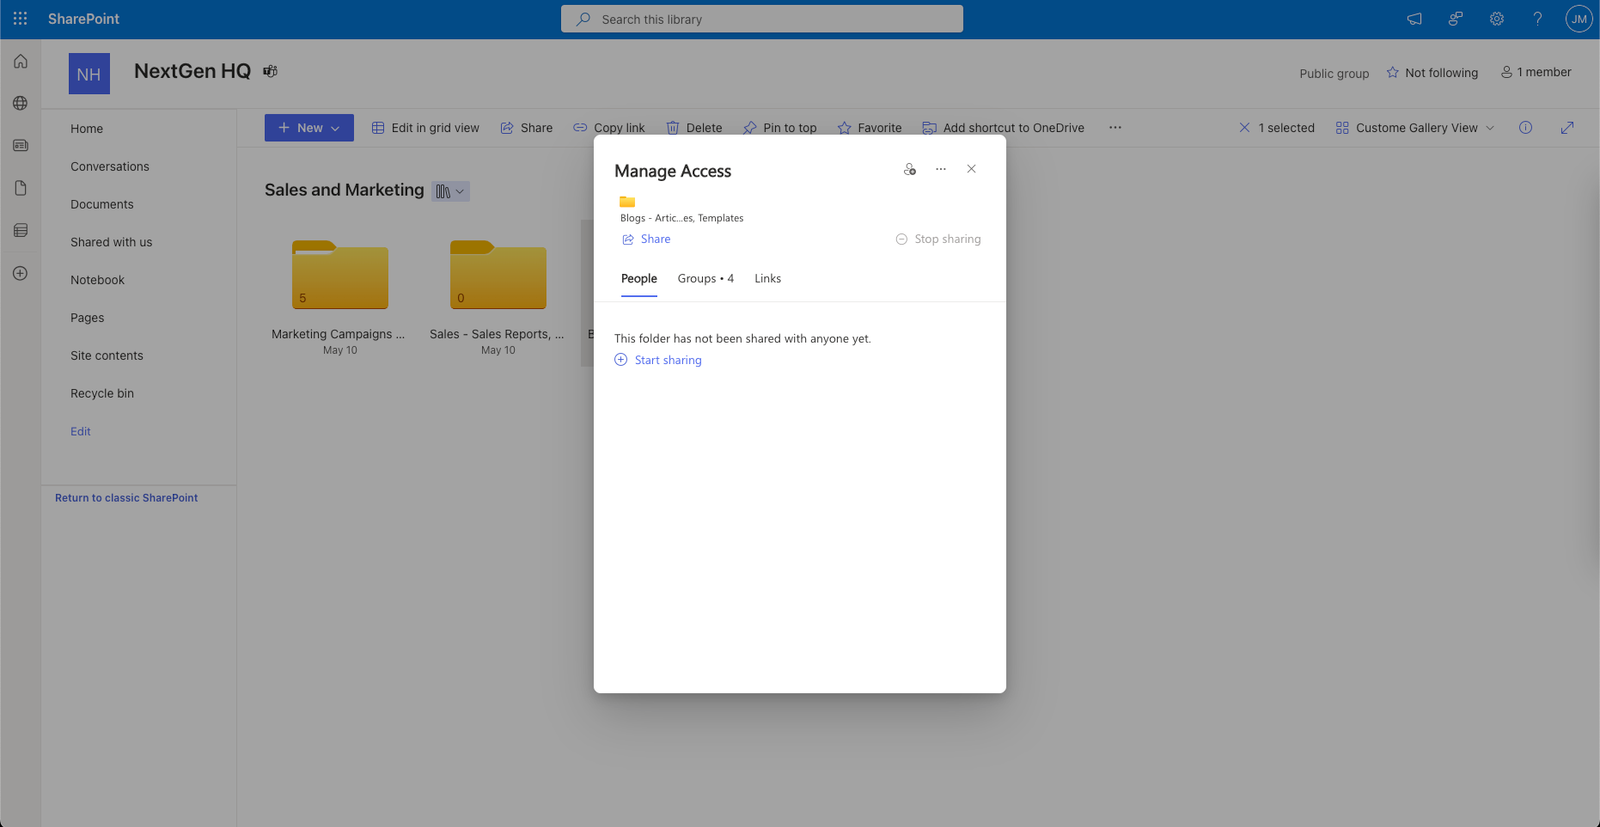
- To manage the permissions of the file or folder, click on the ellipsis (…) icon, and select Manage access. You can see who has access to the file or folder and change or remove their permissions. You can also stop sharing the file or folder or restore the default permissions.
Sharing a file in SharePoint
Managing the permissions of a file in SharePoint
Conclusion
In this blog post, we have shared with you five tips to streamline your workflow and improve your productivity with SharePoint file management. These tips are:
- Create and follow a file naming convention
- Use metadata and views to organize and filter your files
- Use co-authoring and version history to collaborate and track changes
- Use sync and offline access to access your files anytime and anywhere
- Use sharing and permissions to control file access and security
By applying these tips, you can save time, reduce errors, and enhance collaboration with your team and stakeholders. You can also make the most of the powerful features and functionalities that SharePoint offers for file management.
Learn how to manage projects better with AI (Artificial Intelligence)!
Trovve helps you use AI technology for project management, giving you insights, tips, and guidance on how to improve efficiency, productivity, and collaboration. Our articles show professionals in different industries—like technology, professional services, and finance—how to use Trovve’s AI-enhanced features, Microsoft co-pilot and other AI tools for better project results.
Click here to join our newsletter and start your 7-day free trial!
FAQs
Here are some frequently asked questions and answers about SharePoint file management.
Q: How can I find a file or folder in SharePoint?
A: You can use the search box at the top of the page to enter keywords, file names, or metadata. You can also use filters and refiners to narrow down your search results. Alternatively, you can browse through the document library or site contents to locate the file or folder you need.
Q: How can I restore a deleted or overwritten file or folder in SharePoint?
A: You can use the recycle bin to restore items that have been deleted within the last 93 days (about 3 months). You can also use the version history to restore a previous version of a file that has been modified or overwritten. To access the recycle bin or the version history, click on the ellipsis (…) icon next to the file or folder, and select Restore from Recycle Bin or Version History.
Q: How can I move or copy a file or folder in SharePoint?
A: You can use the Move to or copy to commands to move or copy a file or folder to another location within the same site or across different sites. To use these commands, select the file or folder, and click on the Move to or copy to button on the command bar. You can also drag and drop the file or folder to the desired destination.
Q: How can I check out or check in a file in SharePoint?
A: You can use the check out and check in feature to prevent other users from editing a file while you are working on it. To check out a file, select the file, and click on the Check Out button on the command bar. To check in a file, select the file, and click on the Check In button on the command bar. You can also add comments or discard changes when you check in a file.
Q: How can I share a file or folder with external users in SharePoint?
A: You can share a file or folder with external users who have a Microsoft account or an email address. To share a file or folder, select the file or folder, and click on the Share button on the command bar. Enter the email addresses of the external users and choose the permission level you want to give them. You can also change the link settings or add a message if you want. Click on the Send button to share the file or folder with the external users.
