
If you want to share contact group outlook 365, you need to know how to save a forwarded contact group. A contact group is a collection of email addresses that you can use to send messages to multiple recipients at once. Contact groups are useful for sending newsletters, announcements, invitations, and other types of emails to a specific group of people. Saving a forwarded contact group allows you to add the contacts to your own address book, so you can easily access them, update them, and use them again. In this blog, we will show you how to create, forward, and save a contact group in Outlook 365.
How to create a contact group in Outlook 365
Before you can share contact group in outlook 365, you need to create one first. There are two ways to create a contact group in Outlook 365: from scratch or from existing contacts. Here are the steps for both methods.
From scratch
To create a contact group from scratch, follow these steps:
- Open Outlook 365 and click on the People icon at the bottom left corner of the screen.
- Click on the New Contact Group button on the Home tab of the ribbon.
- Enter a name for your contact group in the Name box.
- Click on the Add Members button and choose one of the options: From Outlook Contacts, From Address Book, or New Email Contact.
- Select the contacts you want to add to your contact group and click on the Members button. You can also type the email addresses manually in the Members box.
- Click on the OK button to close the Add Members dialog box.
- Click on the Save & Close button to save your contact group.
From existing contacts
To create a contact group from existing contacts, follow these steps:
- Open Outlook 365 and click on the People icon at the bottom left corner of the screen.
- Select the contacts you want to add to your contact group by holding the Ctrl key and clicking on each contact.
- Right-click on the selected contacts and choose Create Contact Group from the context menu.
- Enter a name for your contact group in the Name box.
- Click on the Save & Close button to save your contact group.
Now you have created a contact group in Outlook 365, you can share it with others by forwarding it as an attachment. We will show you how to do that in the next section.
How to forward a contact group in Outlook 365
After you have created a contact group in Outlook 365, you can share it with others by forwarding it as an attachment. This way, the recipient can save the contact group in their own Outlook 365 and use it to send emails or invitations. Here are the steps to forward a contact group in Outlook 365:
- Open Outlook 365 and click on the People icon at the bottom left corner of the screen.
- Find the contact group you want to forward and double-click on it to open it.
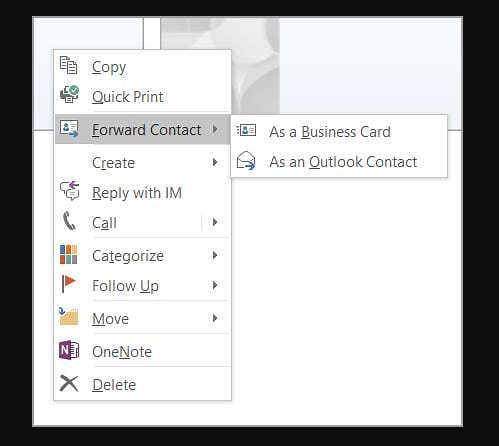
- Click on the Forward Group button on the Home tab of the ribbon and choose As an Outlook Contact from the drop-down menu.
- This will create a new email message with the contact group attached as a .msg file.
- Enter the email address of the person you want to share the contact group with in the To field.
- Add a subject and a message if you want.
- Click on the Send button to send the email with the contact group attachment.
The following image shows an example of how to forward a contact group in Outlook 365:
By following these steps, you can easily share contact groups in Outlook 365 with anyone who uses Outlook 365. This can save you time and effort when you need to communicate with a group of people frequently.
How to save a forwarded contact group in Outlook 365
If someone has shared a contact group with you by forwarding it as an attachment, you can save it in your own Outlook 365 and use it to send emails or invitations. Here are the steps to save a forwarded contact group in Outlook 365:
- Open the email message that contains the contact group attachment and double-click on the attachment to open it.
- Click on the Save & Close button on the Home tab of the ribbon to save the contact group in your Outlook 365.
- Alternatively, you can also drag and drop the contact group attachment from the email message to the People icon at the bottom left corner of the screen.
- This will save the contact group in your Contacts folder.
- You can rename the contact group or edit its members by right-clicking on it and choosing Rename Group or Edit Contact Group from the context menu.
- To use the contact group, you can simply type its name in the To field of a new email message or a meeting request.
By following these steps, you can easily save and use contact groups that someone has shared with you in Outlook 365. This can help you stay connected with a group of people without having to enter their email addresses individually every time. You can also share contact groups in Outlook 365 with others by following the steps in the previous section.
Conclusion
In this blog, we have learned how to create and share contact groups in Outlook 365. Contact groups are a convenient way to organize and communicate with a group of people without having to enter their email addresses individually every time. We have shown you how to create a contact group from scratch, from an email message, or from an Excel file. We have also shown you how to forward a contact group as an attachment to someone else, and how to save and use a forwarded contact group in your own Outlook 365. Here are some tips or best practices for creating and sharing contact groups in Outlook 365:
- Give your contact group a descriptive name that reflects its purpose or membership.
- Add or remove members from your contact group as needed. You can also edit their display names or email addresses.
- Keep your contact group updated and delete any duplicates or invalid email addresses.
- Before you share a contact group with someone, make sure you have their permission and that they use Outlook 365.
- When you receive a contact group attachment, open it and save it in your Contacts folder. You can also rename it or edit it as you wish.
We hope this blog has been helpful and informative. If you have any questions or feedback, please leave a comment below. You can also try the steps in this blog and share your experience with us. Thank you for reading and have a great day!
Learn how to manage projects better with AI!
Trovve helps you use AI technology for project management, giving you insights, tips, and guidance on how to improve efficiency, productivity, and collaboration. Our articles show professionals in different industries—like technology, professional services, and finance—how to use Trovve’s AI-enhanced features, Microsoft co-pilot and other AI tools for better project results.
Click here to join our newsletter and start your 7-day free trial!
