Effective communication and collaboration are essential for both personal and professional success. One tool that has become indispensable for managing contacts and facilitating seamless communication is Microsoft Outlook. Outlook offers a range of features that streamline the process of organizing and sharing contact information, one of which is the Contact Group feature.
Contact Groups in Outlook allow users to create a consolidated list of contacts, making it easier to send emails, schedule meetings, and share information with a specific group of people. Whether you’re a business professional looking to streamline communication with your team or an individual wanting to stay connected with friends and family, understanding how to create, share, and manage a contact group in Outlook is a valuable skill to have.
In this blog post, we will walk you through the process of creating a contact group in Outlook, highlighting the benefits of this feature. We will also explore how to share a contact group with others, troubleshoot any issues that may arise, and effectively manage shared contact groups. Additionally, we will provide you with some best practices to optimize your use of contact groups, ensuring a seamless and efficient communication experience.
So, whether you’re a seasoned Outlook user or just getting started, this blog post will equip you with the knowledge and skills to effectively create, share, and manage contact groups in Outlook. Let’s dive in and discover the power of this feature to enhance your communication and collaboration efforts.
Understanding Outlook Shared Contact Group
When it comes to managing contact groups in Outlook, it’s important to understand the concept of shared contact groups and their significance. A shared contact group refers to a contact list that can be accessed and used by multiple individuals within an organization or a specific group. This feature enables seamless collaboration and communication among team members, ensuring everyone stays informed and connected.
With a shared contact group, you can easily share important contact information with colleagues, friends, or family members, eliminating the need to manually update and distribute contact lists. This not only saves time but also ensures that everyone has the most up-to-date contact details at their fingertips.
Shared contact groups offer several benefits, including:
-
-
- Efficiency: By creating a shared contact group, you can save time by avoiding the need to individually send contact information to multiple people. Instead, you can simply share the contact group, allowing everyone to access it instantly.
- Consistency: When multiple individuals work on a project or collaborate within a team, it is crucial to have consistent and accurate contact information. Shared contact groups ensure that everyone has the same up-to-date contact details, reducing the chances of miscommunication or outdated information.
- Collaboration: Shared contact groups foster collaboration by enabling team members to easily communicate and share information with each other. Whether it’s sending a group email or scheduling a meeting, having a shared contact group streamlines the process and promotes effective teamwork.
- Centralized Management: With shared contact groups, you can centrally manage contact information, making it easier to add or remove contacts as needed. This centralized approach ensures that any updates or changes to contact details are reflected across the entire group, eliminating the hassle of maintaining multiple contact lists.
-
By understanding the concept and benefits of shared contact groups in Outlook, you can harness the power of this feature to enhance collaboration, streamline communication, and ensure that everyone has access to the most accurate and up-to-date contact information. In the following sections, we will explore how to create, share, and manage contact groups in Outlook, providing you with step-by-step instructions and best practices. Let’s get started!
How to Create a Contact Group in Outlook
Creating a contact group in Outlook is a straightforward process that allows you to consolidate and organize your contacts for efficient communication. In this section, we will guide you through the steps of creating a contact group in Outlook. We will also discuss why creating a contact group can be useful in managing your contacts effectively.
Why Creating a Contact Group is Useful
Before we delve into the steps of creating a contact group in Outlook, let’s first understand the benefits of this feature:
-
-
- Easy Communication: By creating a contact group, you can streamline your communication process. Instead of individually selecting and adding recipients for each email or meeting invitation, you can simply select the contact group, saving time and effort.
- Categorization and Organization: Contact groups allow you to categorize and organize your contacts based on specific criteria. For example, you can create separate contact groups for work colleagues, clients, friends, or family members, making it easier to find and reach out to the right people.
- Efficient Updates: When contact details change, updating multiple individual contacts can be time-consuming. However, by creating a contact group, you can update the group’s contact information once, and the changes will be automatically reflected for all members, ensuring everyone has the most up-to-date information.
-
Now that we understand the benefits, let’s proceed with the steps to create a contact group in Outlook.
Steps to Create a Contact Group
Follow these steps to create a contact group in Outlook:
-
-
- Open Outlook: Launch the Microsoft Outlook application on your computer.
- Navigate to Contacts: Click on the “Contacts” tab or icon in the navigation pane to access your contacts.
- Click on “New Contact Group”: Look for the option to create a new contact group. In most versions of Outlook, this option will be labeled as “New Contact Group” or “New Group.”
- Name the Contact Group: Provide a descriptive name for your contact group. Choose a name that clearly identifies the purpose or category of the group.
- Add Members: Click on the “Add Members” button or option to add contacts to the group. You can choose contacts from your existing contact list or add new ones.
- Select Contacts: Choose the contacts you want to add to the group by selecting their names from your contact list. You can use the Ctrl or Shift key to select multiple contacts.
- Click “Save”: Once you have added all the desired contacts, click the “Save” or “OK” button to create the contact group.
-
Congratulations! You have successfully created a contact group in Outlook. Now you can easily access and use this group for sending emails, scheduling meetings, or sharing information with the selected contacts.
In the next section, we will explore how to add contacts to an existing contact group. Stay tuned!
How to Share a Contact Group in Outlook
Sharing a contact group in Outlook allows you to collaborate and communicate effectively with others by providing them access to the same set of contacts. Whether you want to share a contact group with colleagues for a project, with friends for event planning, or with family members for staying connected, Outlook makes it easy to share contact groups. In this section, we will guide you through the steps to share a contact group in Outlook and provide tips for troubleshooting any issues that may arise.
Preparation for Sharing a Contact Group
Before you share a contact group in Outlook, make sure you have the following prepared:
-
-
- Updated Contact Group: Ensure that the contact group you want to share is up to date with the correct and current contact information.
- Recipient Information: Have the email addresses or Outlook accounts of the people you want to share the contact group with. This will allow you to send them the necessary invitation or access.
- Permission Levels: Determine the level of access you want to grant to the recipients. Outlook provides different permission levels, such as “Full Details” (allows recipients to view and edit the contact group) or “View Only” (allows recipients to view the contact group but not make any changes).
-
Steps to Share a Contact Group
Follow these steps to share a contact group in Outlook:
-
-
- Open Outlook: Launch the Outlook application on your computer.
- Navigate to Contacts: Click on the “Contacts” tab or icon in the navigation pane to access your contacts.
- Select the Contact Group: Locate and select the contact group you want to share from your list of contact groups.
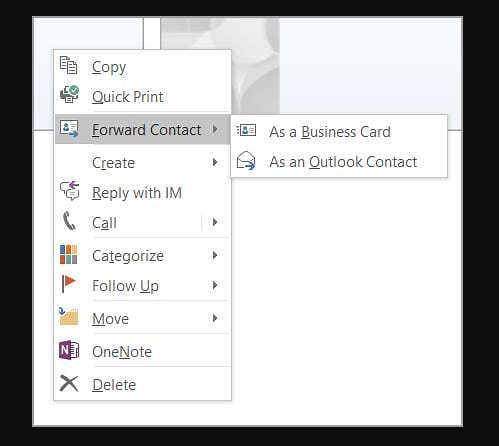
- Click on “Forward Group”: Look for the option to forward the contact group. In most versions of Outlook, this option will be labeled as “Forward Group” or “Send Contact Group.”
- Choose Recipients: Enter the email addresses or select the Outlook accounts of the recipients you want to share the contact group with. You can add multiple recipients by separating their email addresses with commas.
- Set Permission Level: Specify the permission level you want to grant to the recipients. Choose either “Full Details” or “View Only,” depending on your requirements.
- Compose and Send: Compose a brief message explaining the purpose of the shared contact group, if necessary. Once ready, click the “Send” button to share the contact group with the selected recipients.
-
Troubleshooting Shared Contact Group Issues
Sometimes, issues may arise when sharing a contact group in Outlook. Here are a few common problems and their possible solutions:
-
-
- Recipient Unable to Access: If a recipient is unable to access the shared contact group, ensure that they are using a compatible version of Outlook and that their email address or Outlook account is correctly entered.
- Permission Issues: If a recipient is unable to make changes to the shared contact group when granted “Full Details” permission, verify that their permission level is correctly set. Additionally, make sure they are not experiencing any network or connectivity issues.
- Contact Group Not Updated: If recipients are viewing an outdated version of the contact group, verify that you have made the necessary updates and resend the contact group to them.
-
By following these steps and troubleshooting tips, you can easily share contact groups in Outlook, fostering collaboration and efficient communication with your intended recipients. In the next section, we will explore how to manage a shared contact group in Outlook.
How to Manage a Shared Contact Group in Outlook
Once you have shared a contact group in Outlook, it is important to effectively manage it to ensure that the contact information remains accurate and up to date. In this section, we will discuss how to manage a shared contact group in Outlook by adding or removing contacts, updating contact information, and deleting a shared contact group if necessary.
Adding or Removing Contacts
To manage a shared contact group by adding or removing contacts, follow these steps:
-
-
- Open Outlook: Launch the Outlook application on your computer.
- Navigate to Contacts: Click on the “Contacts” tab or icon in the navigation pane to access your contacts.
- Open the Shared Contact Group: Locate and open the shared contact group that you want to manage.
- Add Contacts: To add contacts to the group, click on the “Add Members” button or option and select the desired contacts from your existing contact list. You can use the Ctrl or Shift key to select multiple contacts. Click “Save” or “OK” to add them to the shared contact group.
- Remove Contacts: To remove contacts from the group, select the contact you want to remove and click on the “Remove” or “Delete” button. Confirm the deletion if prompted.
-
By adding or removing contacts as needed, you can ensure that the shared contact group remains up-to-date and relevant.
Updating Contact Information
To manage a shared contact group by updating contact information, follow these steps:
-
-
- Open Outlook: Launch the Outlook application on your computer.
- Navigate to Contacts: Click on the “Contacts” tab or icon in the navigation pane to access your contacts.
- Open the Shared Contact Group: Locate and open the shared contact group that you want to update.
- Edit Contact Information: Select the contact whose information you want to update, and make the necessary changes to their details. This can include their name, email address, phone number, or any other relevant information.
- Save Changes: After updating the contact information, click on the “Save” or “OK” button to save the changes. The updated information will be reflected for all members of the shared contact group.
-
By regularly updating contact information, you can ensure that everyone in the shared contact group has the most accurate and current details.
Deleting a Shared Contact Group
If a shared contact group is no longer needed or becomes obsolete, you can delete it. However, keep in mind that deleting a shared contact group will remove it for all members. To delete a shared contact group, follow these steps:
-
-
- Open Outlook: Launch the Outlook application on your computer.
- Navigate to Contacts: Click on the “Contacts” tab or icon in the navigation pane to access your contacts.
- Locate the Shared Contact Group: Find the shared contact group that you want to delete from your list of contact groups.
- Select the Contact Group: Click on the shared contact group to select it.
- Delete the Contact Group: Right-click on the selected contact group, and from the context menu, choose the option to “Delete” or “Remove” the contact group. Confirm the deletion if prompted.
-
Please exercise caution when deleting a shared contact group, as it cannot be undone. Make sure to communicate with the other members of the group before deleting it.
By effectively managing a shared contact group in Outlook through adding or removing contacts, updating contact information, and deleting when necessary, you can ensure that the group remains relevant, accurate, and beneficial for all members. In the next section, we will discuss some best practices for using shared contact groups in Outlook.
Best Practices for Using Shared Contact Groups
To maximize the effectiveness and efficiency of using shared contact groups in Outlook, it is important to follow some best practices. These practices will help you optimize your contact management, ensure smooth collaboration, and maintain accurate and up-to-date contact information. In this section, we will discuss some essential best practices for using shared contact groups in Outlook.
Properly Naming Your Contact Groups
When creating shared contact groups, it is crucial to give them clear and descriptive names. Consider using names that reflect the purpose or category of the group, making it easier for all members to identify and locate the appropriate contact group. Avoid generic or ambiguous names that may cause confusion or overlap with other groups.
Regularly Updating Contact Information
To ensure that the shared contact groups remain useful and relevant, it is important to regularly update contact information. Encourage all members to inform you of any changes to their contact details promptly. Regularly review and verify the information within the shared contact group, making necessary updates as needed. This will help maintain accurate and up-to-date contact information for everyone involved.
Resolving Shared Contact Group Conflicts
In situations where multiple members have editing access to a shared contact group, conflicts may arise when simultaneous changes are made. To avoid conflicts, establish clear communication and guidelines among the group members. Encourage members to communicate changes they plan to make to the shared contact group, especially if it involves significant updates. This way, everyone can coordinate and avoid conflicting changes, ensuring smooth collaboration and accurate data.
Regularly Backing Up Contact Groups
As with any valuable data, it is essential to regularly back up your shared contact groups. Outlook provides options to export and save your contact groups as backup files. By regularly backing up your contact groups, you can protect them from any potential data loss or system failures. Set a schedule to back up your contact groups and store the backups in a secure location.
Communicating Changes and Updates
Effective communication is key when using shared contact groups. Whenever significant changes or updates are made to a shared contact group, communicate these changes to all members. This can be done through a group email or a dedicated communication channel. By keeping everyone informed, you ensure that everyone is working with the most current and accurate contact information.
By following these best practices, you can make the most of shared contact groups in Outlook. These practices will help you maintain organized and up-to-date contact information, foster effective collaboration, and ensure successful communication within your teams or groups.
In conclusion, understanding how to create, share, and manage contact groups in Outlook is a valuable skill that can enhance your communication and organizational capabilities. By utilizing shared contact groups effectively and following the best practices outlined in this blog post, you can streamline your contact management, improve collaboration, and stay connected with your contacts more efficiently.